

Photography blends technical skill with creative vision, and mastering the basics of shutter speed, aperture, and ISO (known as the “exposure triangle”) is essential for capturing stunning images. These elements control light, motion, and image quality, transforming ordinary photos into extraordinary ones.
Imagine taking the perfect shot, only to find it blurred or poorly lit. Such issues often stem from not understanding shutter speed, aperture, and ISO. This guide will explain each element and how they interact to affect exposure, helping you achieve better control and creative expression in your photography.
By the end of this article, you’ll understand these fundamentals, ready to tackle various photographic challenges and enhance your skills, whether you’re a beginner or looking to refine your craft.
What Is Shutter Speed?
Definition and importance: Shutter speed refers to the amount of time the camera’s shutter remains open, allowing light to hit the camera sensor. It is a crucial aspect of exposure, influencing not only how much light enters the camera but also how motion is captured in an image. Shutter speed is typically measured in seconds or fractions of a second (e.g., 1/1000s, 1/250s, 1s). Understanding shutter speed is essential for controlling the clarity and sharpness of your photos, especially in varying lighting conditions and when capturing fast-moving subjects.
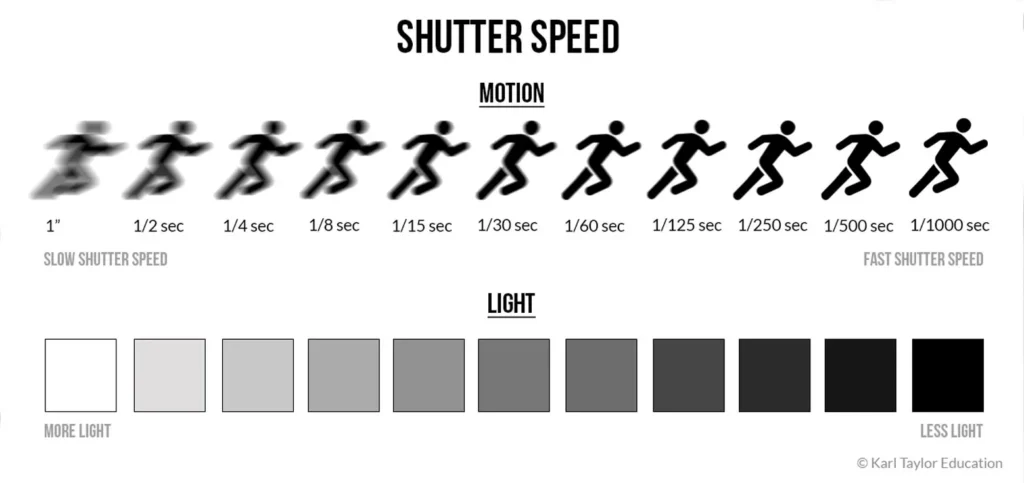

Shutter Speed Settings: Shutter speed settings can vary widely, from extremely fast speeds like 1/4000s to very slow speeds such as 30 seconds or more. Here’s a breakdown of common shutter speed ranges and their typical uses:
- Fast Speeds (1/1000s and faster): Ideal for freezing fast action, such as in sports photography or wildlife photography.
- Moderate Speeds (1/250s to 1/500s): Suitable for general-purpose photography, capturing everyday scenes with minimal motion blur.
- Slow Speeds (1/60s to 1s): Useful for low-light conditions or creating motion blur effects, such as in panning shots.
- Very Slow Speeds (1s and slower): Often used in long exposure photography to capture light trails, star trails, and smooth water effects.
Effects of Shutter Speed: The primary effect of shutter speed on an image is how motion is rendered:
- Freezing Action: Fast shutter speeds (e.g., 1/1000s) can freeze fast-moving subjects, resulting in sharp, clear images without motion blur. This is perfect for capturing sports events or wildlife in motion.
- Motion Blur: Slow shutter speeds (e.g., 1/30s or slower) create motion blur, which can convey a sense of movement. This technique is often used in creative photography to depict flowing water, moving traffic, or spinning objects.
Visual examples can illustrate these effects effectively. For instance, a photo of a racing car at 1/1000s will be crisp and clear, while the same scene shot at 1/30s will show the car with a motion blur, emphasizing speed.
Tips: Choosing the right shutter speed depends on the photographic situation and desired outcome. Here are some practical tips:
- Fast Action: Use fast shutter speeds (1/500s or faster) to freeze motion in sports or wildlife photography.
- Low Light: In dim conditions, a slower shutter speed can help capture more light, but be mindful of camera shake. Using a tripod can stabilize the camera during long exposures.
- Panning: To create a sense of motion while keeping the subject sharp, use a moderate shutter speed (e.g., 1/30s) and move the camera along with the moving subject.
- Avoiding Camera Shake: When shooting handheld, keep the shutter speed faster than the reciprocal of your lens’s focal length (e.g., use 1/60s or faster for a 50mm lens) to minimize blur.
Understanding and mastering shutter speed allows photographers to creatively capture motion, light, and time, significantly enhancing their ability to tell compelling visual stories.

What is Aperture?
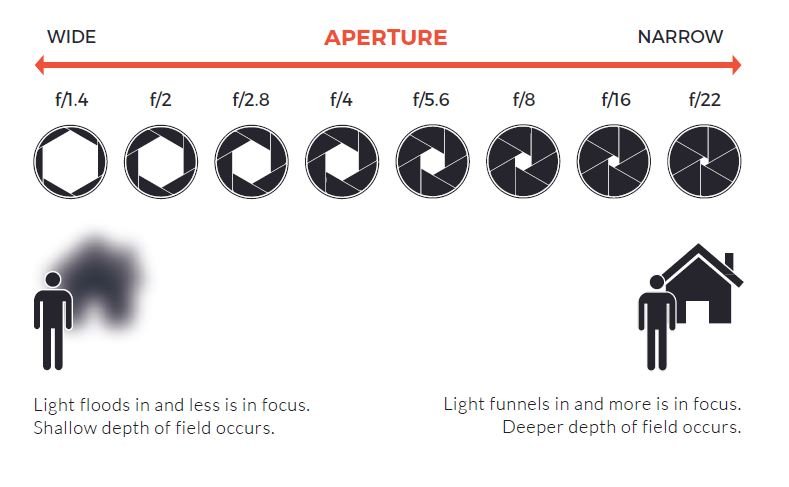
Definition and Importance: Aperture refers to the opening in a camera lens through which light enters the camera body and hits the sensor. It is a crucial element of exposure, affecting both the amount of light reaching the sensor and the depth of field in an image. Aperture is measured in f-stops (e.g., f/1.4, f/2.8, f/5.6), where a lower f-stop number indicates a larger aperture opening, and a higher f-stop number indicates a smaller aperture opening. Mastering aperture settings is essential for controlling exposure and achieving desired artistic effects, such as background blur and sharpness across an image.
Aperture Settings: Aperture settings can vary widely, and each f-stop value has distinct characteristics and uses:
- Wide Apertures (e.g., f/1.4, f/2.0): These settings allow a lot of light to enter the camera, making them ideal for low-light conditions. They also create a shallow depth of field, which helps to isolate subjects from the background by creating a pleasing background blur (bokeh).
- Moderate Apertures (e.g., f/5.6, f/8): These are versatile settings for general photography, providing a balanced depth of field and suitable light intake for various lighting conditions.
- Narrow Apertures (e.g., f/16, f/22): These settings allow less light into the camera, requiring brighter conditions or slower shutter speeds. They create a deep depth of field, keeping both foreground and background elements in sharp focus, which is ideal for landscape photography.
Adjusting aperture is straightforward on most cameras, typically involving rotating a dial or selecting from a menu. On DSLR and mirrorless cameras, aperture priority mode (A or Av) allows photographers to choose the aperture while the camera automatically adjusts the shutter speed.
Effects of Aperture: Aperture significantly influences two key aspects of a photograph: exposure and depth of field.
- Exposure: A wide aperture (low f-stop number) allows more light to reach the sensor, brightening the image. Conversely, a narrow aperture (high f-stop number) reduces the light intake, darkening the image.
- Depth of Field: Aperture controls the range of focus in an image. A wide aperture (e.g., f/1.8) creates a shallow depth of field, making the subject stand out against a blurred background. A narrow aperture (e.g., f/16) increases the depth of field, keeping more of the scene in focus from foreground to background.
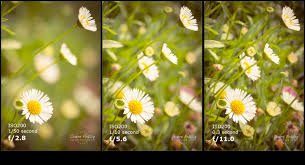
Examples can vividly illustrate these effects. A portrait shot at f/1.8 will have the subject in sharp focus with a beautifully blurred background, while a landscape shot at f/16 will show sharp detail from the nearest elements to the distant horizon.
Tips: Choosing the right aperture depends on the type of photograph and the desired visual effect. Here are some practical tips:
- Portraits: Use a wide aperture (e.g., f/1.8) to achieve a shallow depth of field, making the subject pop against a blurred background.
- Landscapes: Use a narrow aperture (e.g., f/16) to ensure everything from the foreground to the background is in sharp focus.
- Low Light: In low-light conditions, a wide aperture (e.g., f/2.8) helps capture more light, reducing the need for high ISO settings that can introduce noise.
- Macro Photography: For close-up shots, a moderate aperture (e.g., f/8) can balance depth of field and sharpness, ensuring the subject is in focus.
Understanding and effectively using aperture allows photographers to control exposure and creatively influence the depth of field, resulting in images that are both technically precise and artistically compelling.

What is ISO?
Definition and Importance: ISO measures the sensitivity of your camera’s sensor to light. Originally a term from film photography, ISO now plays a crucial role in digital photography. A lower ISO value (e.g., ISO 100) means the sensor is less sensitive to light, requiring more light for a proper exposure. Conversely, a higher ISO value (e.g., ISO 3200) increases the sensor’s sensitivity, allowing you to shoot in darker conditions. Understanding ISO is essential for achieving the right exposure in various lighting situations and managing image quality.

ISO Settings: ISO settings can range from very low (ISO 50) to very high (ISO 25600 and beyond). Here are some common ISO ranges and their typical uses:
- Low ISO (e.g., ISO 100-200): Ideal for bright, well-lit environments. Low ISO settings produce the highest image quality with minimal noise.
- Moderate ISO (e.g., ISO 400-800): Suitable for indoor photography or overcast days. These settings balance light sensitivity and image quality.
- High ISO (e.g., ISO 1600-3200): Useful in low-light conditions, such as evening or indoor shots without flash. Higher ISO settings allow for faster shutter speeds but can introduce noise.
- Very High ISO (e.g., ISO 6400 and above): Necessary for extremely low-light situations, like night photography or indoor sports. These settings increase noise but enable shooting in challenging lighting.
Adjusting ISO is straightforward on most cameras, typically done through a dial or menu settings. Some cameras have an Auto ISO feature, which automatically adjusts ISO based on the lighting conditions, allowing the photographer to focus on other settings.
Effects of ISO: ISO directly affects image brightness and quality:
- Brightness: Increasing ISO makes the image brighter by making the sensor more sensitive to light. This is particularly useful in low-light situations where you cannot slow the shutter speed or widen the aperture further.
- Noise: Higher ISO settings can introduce noise (graininess) into an image, reducing its overall quality. Modern cameras manage noise better, but it’s still crucial to balance ISO with shutter speed and aperture to maintain image quality.
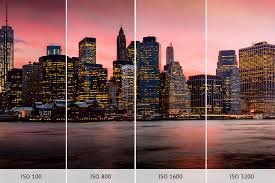
Examples can illustrate these effects effectively. A photo taken at ISO 100 in bright daylight will be clear and sharp, while a photo taken at ISO 3200 in low light might show noticeable grain.
Tips: Choosing the right ISO setting depends on the lighting conditions and desired outcome. Here are some practical tips:
- Bright Light: Use a low ISO (e.g., ISO 100) to maintain the highest image quality with minimal noise.
- Low Light: Increase ISO (e.g., ISO 800) to brighten the image without relying solely on slower shutter speeds or wider apertures. Be mindful of noise.
- Indoor Photography: Moderate ISO settings (e.g., ISO 400-800) help achieve proper exposure without too much noise, especially when shooting handheld.
- Night Photography: High ISO settings (e.g., ISO 1600 and above) are necessary, but consider using noise reduction software in post-processing to minimize grain.
Mastering ISO is about finding the right balance between light sensitivity and image quality. Understanding how to adjust ISO settings based on the shooting environment and the interplay with shutter speed and aperture will help you achieve well-exposed, high-quality images in various conditions.

The Exposure Triangle
Understanding The Exposure Triangle: The exposure triangle is a fundamental concept in photography that illustrates the relationship between shutter speed, aperture, and ISO. These three elements work together to determine the exposure of an image, how light or dark the photo appears. Mastering the exposure triangle is essential for achieving the correct exposure and creatively controlling the appearance of your photos.

Interaction Between Shutter Speed, Aperture, and ISO: Each component of the exposure triangle has a distinct effect on your images, and adjusting one will influence the others:
- Shutter Speed: Controls the duration the camera’s sensor is exposed to light. Faster speeds reduce light but freeze action; slower speeds increase light but can introduce motion blur.
- Aperture: Regulates the amount of light entering the camera through the lens. A wider aperture (low f-stop number) allows more light and creates a shallow depth of field; a narrower aperture (high f-stop number) allows less light and increases depth of field.
- ISO: Adjusts the sensor’s sensitivity to light. Lower ISO settings produce less noise but require more light; higher ISO settings increase sensitivity but can introduce noise.
Achieving the Right Balance: Balancing these three settings is key to capturing well-exposed images. Here are some scenarios and how to balance the exposure triangle:
Bright Daylight:
- Shutter Speed: Use a fast shutter speed (e.g., 1/1000s) to avoid overexposure.
- Aperture: A moderate aperture (e.g., f/8) ensures adequate depth of field.
- ISO: Set a low ISO (e.g., ISO 100) to maintain image quality.
Low Light (Indoor/Evening):
- Shutter Speed: Use a slower shutter speed (e.g., 1/60s) to allow more light, but consider using a tripod to avoid camera shake.
- Aperture: Use a wide aperture (e.g., f/2.8) to maximize light intake.
- ISO: Increase ISO (e.g., ISO 1600) to brighten the image, balancing with noise levels.
Action Photography:
- Shutter Speed: Use a fast shutter speed (e.g., 1/1000s or faster) to freeze motion.
- Aperture: A wide aperture (e.g., f/2.8) helps achieve a fast shutter speed by allowing more light.
- ISO: Increase ISO (e.g., ISO 800) if needed to maintain proper exposure without compromising shutter speed or aperture settings.
Landscape Photography:
- Shutter Speed: A moderate speed (e.g., 1/125s) works well, but consider slower speeds for long exposure effects.
- Aperture: Use a narrow aperture (e.g., f/16) for a deep depth of field.
- ISO: Keep ISO low (e.g., ISO 100) to maintain maximum image quality and detail.
Tips for Balancing the Exposure Triangle: Here are some practical tips to help you balance shutter speed, aperture, and ISO effectively:
- Use Manual Mode: Experiment with manual mode on your camera to gain full control over all three settings. This will help you understand how each element affects the exposure.
- Prioritize Settings Based on Your Goal: Decide which aspect is most important for your shot (motion, depth of field, or light sensitivity) and adjust the other two settings accordingly.
- Bracket Your Shots: Take multiple shots with different settings to see which combination works best. This technique can be particularly useful in challenging lighting conditions.
- Leverage Exposure Compensation: Use exposure compensation to fine-tune your exposure when shooting in semi-automatic modes like aperture priority or shutter priority.
Understanding and balancing the exposure triangle enables photographers to capture well-exposed, visually appealing images in any situation.

Conclusion
Mastering the interplay between shutter speed, aperture, and ISO is essential for any photographer aiming to capture compelling, high-quality images. These three elements form the backbone of photographic exposure, each contributing uniquely to the final outcome of a photograph.
- Shutter Speed: This controls how motion is rendered in your images, from freezing fast action to creating beautiful motion blur effects.
- Aperture: This affects both the exposure and the depth of field, allowing photographers to isolate subjects or ensure sharpness throughout a scene.
- ISO: This determines the sensor’s sensitivity to light, enabling shooting in various lighting conditions but also impacting image noise and quality.
Understanding each element individually is important, but the real magic happens when you learn to balance all three. The exposure triangle illustrates this balance, showing how adjusting one element requires compensatory changes in the others to maintain proper exposure.
By mastering these concepts, photographers can make informed decisions based on the shooting environment and their creative vision. Whether you’re shooting fast-paced action, stunning landscapes, or intimate portraits, the knowledge of how to manipulate shutter speed, aperture, and ISO will empower you to achieve your desired results.